Need help with your Hostinger email setup? Such as linking your Hostinger Titan emails to Gmail?
This is mostly done for convenience. Most of us aren’t at our desktops the entire day, and we need easy access to our Hostinger Titan emails.
Also, if you send an email through Gmail, instead of it looking like this: jane@gmail.com, it’ll look more professional: jane@yourbusinessname.com
By connecting your free Hostinger domain email to your Gmail account, you can send and receive emails directly from your Gmail account– and have easy mobile access. You’ll be using a professional email address and your Gmail address will not be visible to others.
How many email aliases should I have?
You can link multiple domain emails to one Gmail account. Thus, you can have both support@yourbusinessname.com and jane@yourbusinessname.com emails coming to one account.
You wouldn’t want to get confused though i.e. emails related to support and general inquiries should go to one Gmail account, and careers should go to another account.
Ready to get your Titan email linked with Gmail?
In a few minutes, you’ll be able to easily access your Titan emails on your mobile device through Gmail, instead of checking the Titan email interface on a computer.
Get your free email with Hostinger
If you’re reading this post I’m assuming you already have a professional domain email address offered by Hostinger. If you haven’t set up your free Hostinger email yet, check the steps below:
How to setup up your free Hostinger Titan email
- Log into your Hostinger account and head to the emails tab at the top.
- To create a new email click on the row where it says free email.
- Now select email accounts.
- Click on create new email account on the top right corner.

- Fill in your details, and then hit the button and press done to save changes.

If you already set up your professional email then you will find it in the email section in the Hostinger dashboard.
In this tutorial, you can use an email you already have or create a new email as shown above.
Let’s log into our Titan email account to see if this email works.
Open a new tab, go to mail.hostinger.com, and log in with your Titan email details.
If you can’t log in you can reset your password as detailed below.
How to reset your Hostinger Titan Gmail password
- Head to the emails section in the Hostinger dashboard. Click on the three dots next to the email you want to edit.
- Select the option to reset password.
- Enter any email address to receive your reset link. Hostinger will send a reset link to that email address: click the link.

What you need for this setup:
- Keep your Titan email dashboard open
- Your Gmail account
- An image or open tab of the IMAP and POP configuration settings from Hostinger
Configuration settings you need to link your Hostinger Titan email with Gmail
- Go to emails on your Hostinger dashboard, and click manage [on] your selected email. This will take you to the Titan webmail dashboard.(img)
- Click on configure desktop app and take a screenshot of those details, or leave this tab open. You will need this information to link your Gmail to Titan.(img)
Gmail Account setup
Make sure this is the Gmail account from which you would like to send and receive emails.
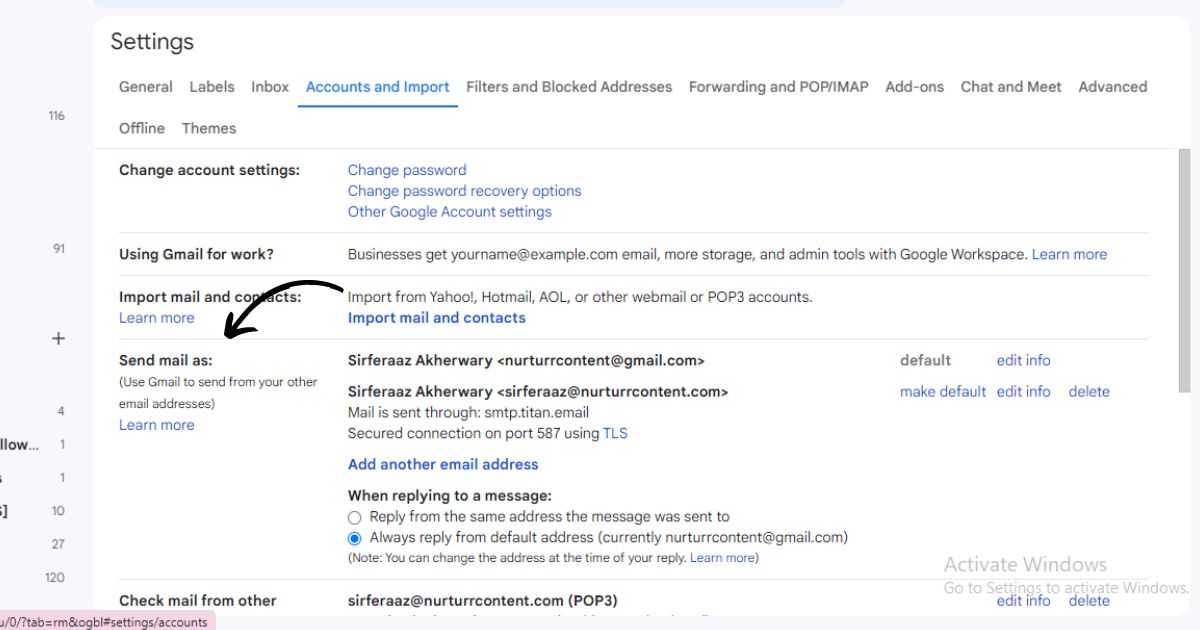
Go to the settings in Gmail and click on See all settings.
Head to the accounts and import tab. This is where you select the domain email that you created in Hostinger.
Click on send mail as and fill in the display name (Like Jane, or Jane at Nurturrcontent) and domain email and tick the one box and go to the next step.(Img)
Now, you’ll use the server information from the screenshot we took previously. Copy and paste the data for the SMTP server, port value, and fill it in. Fill in the username [domain email] and password, tick the first box for TLS, and click Add account.
Get the verification code from the Titan email tab we left open and paste it in to verify account this account.(img)
Your Titan domain email will appear at the send mail as section.
Let’s do a test…(img)
Titan – Gmail configuration test email
Now when you compose an email you’ll have the option to send it from your regular Gmail account or from your domain email.(img)
Gmail will send a link to confirm sending the email with this alias.
Alternatively, you can choose to have your professional email as your default email.
You don’t have to do this, but I would recommend it because sometimes you may forget to switch to your domain alias before sending an email.
>>Get your free Pinterest Pin Template Kit NOW!<<
How to receive domain emails in Gmail
Now that you know how to send professional emails from Gmail. Let’s take it a step further so we can also receive emails going to this domain email in our Gmail account, and to do that:
- Go to Check mail from other accounts in Gmail, and select Add a mail account. A window will pop up and here you’ll add your domain email again and click next. (Img)
- Leave the default POP3 settings. On the next window, add your username [which is the domain email address] and password, and choose the first three checkbox options.(img)
- Input the data for the POP3 server and port values as we did before. (Img)
- Click add account.
Now you should see the new email appear in the settings. (img)
Reply to the domain email and it should be sent to Gmail.
I have tested this by replying to the previous email.(img) It works!